How to Take Blood Pressure

CPDTime.
19m

Published: 18 June 2023

There are many ways to measure blood pressure. The most simple and common way to measure blood pressure is the brachial artery occlusion method, commonly known as the cuff.

The accuracy of the measurement depends on correct cuff sizing and operator use. It can be done automatically, but once again, training is required for automatic use.

What is Blood Pressure?

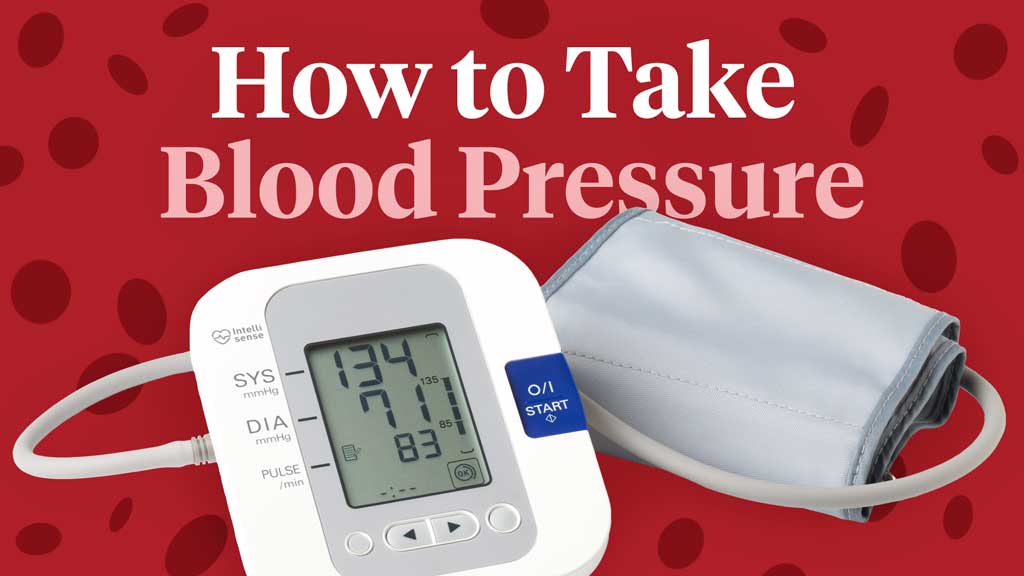
Blood pressure (BP) is a measure of the pressure exerted by the blood as it flows through the arteries. It is measured in millimetres of mercury (mmHg.

The purpose of taking a blood pressure measurement may be to:

  1. Determine a person’s haemodynamic status
  2. Gain a baseline
  3. Monitor for changes from the baseline.

Blood pressure measurements take into account:

  • Systolic measurements (the contraction of the ventricles) and
  • Diastolic measurements (the ventricles are at rest and filling).
systolic v diastolic blood pressure

A normal systolic pressure for an adult is less than 120 mmHg, and a normal diastolic is less than 80 mmHg (NIA 2022).

Influencing factors include but are not limited to:

  • Anxiety
  • Cardiac output
  • Vascular resistance
  • Blood volume and blood viscosity
  • Age
  • Exercise
  • Stress
  • Ethnicity
  • Gender
  • Medications
  • Body weight
  • Diurnal variations
  • Disease processes
  • Hypervolaemia
  • Hypovolemia.

Manual Blood Pressure Readings

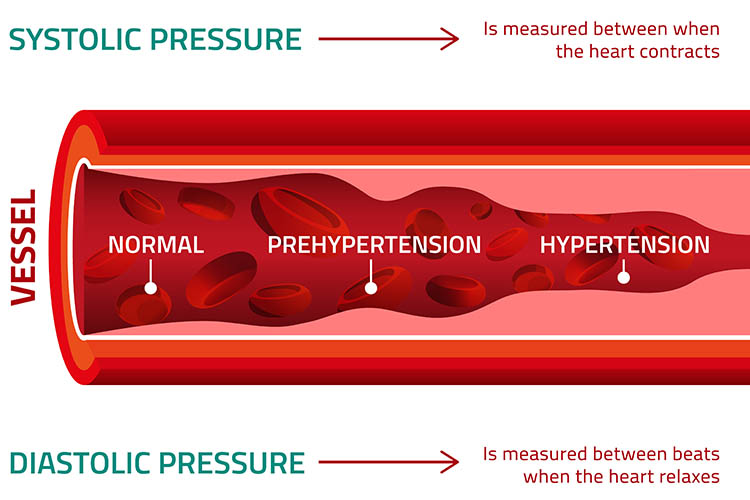
Blood can only be heard through a stethoscope if it is turbulent. As the cuff is inflated, the artery is compressed, making the blood flow through the artery turbulent. When the artery is completely closed, there is no blood flow and no sound. As pressure in the cuff is reduced, the point at which the artery is open just enough to let the blood pass is the systolic blood pressure.

This is detected by turbulent blood flow heard through the stethoscope. The resulting turbulence produces characteristic tapping sounds known as Korotkoff sounds. As pressure in the cuff is further reduced, the vessel will once again be completely open and non-turbulent. At this point, no more Korotkoff sounds are heard and diastolic blood pressure has been reached.

Korotkoff Sounds

Korotkoff sounds are generated when a blood pressure cuff changes the flow of blood through the artery. These sounds are heard through either a stethoscope or a doppler that is placed distal to the blood pressure cuff.

There are five distinct phases of Korotkoff sounds:

Phase 1: A sharp tapping. This is the first sound heard as the cuff pressure is released. This sound provides the systolic pressure reading.
Phase 2: A swishing/whooshing sound. Swishing sounds as the blood flows through blood vessels as the cuff is deflated.
Phase 3: A thump (softer than phase 1). Intense thumping sounds that are softer than phase 1 as the blood flows through the artery but the cuff pressure is still inflated to occlude flow during diastole.
Phase 4: A softer, blowing, muffled sound that fades. Softer and muffled sounds as the cuff pressure is released. The change from the thump of phase 3 to the muffled sound of phase 4 is known as the first diastolic reading.
Phase 5: Silence. Silence that occurs when the cuff pressure is released enough to allow normal blood flow. This is known as the second diastolic reading.

A Step by Step Guide on How to Take a Blood Pressure Measurement

Step 1

Initial preparation:

  • Introduce yourself and verify patient identity using your clinical setting protocol.
  • Obtain consent from the patient for the assessment and explain the procedure.
  • Ensure that the patient has not consumed caffeine or tobacco in the last 30 minutes.
  • The patient should be allowed to rest for 5 minutes following activity.
  • Prepare the environment by making the room quiet, ensuring patient privacy and checking that equipment is intact and clean. Blood pressure is measured indirectly with a stethoscope or doppler and a sphygmomanometer. A sphygmomanometer includes the blood pressure cuff, connection tubes, air pump and manometer.
  • Perform hand hygiene.

Step 2

Choose a measurement site:

  • The preferred site is the brachial pulse site where the brachial artery runs across the antecubital fossa.
  • Another site is the posterior thigh, where the popliteal artery runs behind the knee joint.
  • The site should be free from pain, injury, surgical incisions, intravenous cannulas, central venous or arterial lines, areas with poor perfusion, arteriovenous fistulas or AV shunts. This reduces the risk of patient harm and helps to ensure result accuracy.

Step 3

Position the patient either sitting, standing, supine or prone depending on your choice of measurement site.

  • If sitting, their feet should be flat on the floor.
  • The limb should be fully exposed so the cuff can be correctly applied - don’t apply the cuff over clothing.
  • If using the arm: Patients should be supported so that the midpoint of the upper arm is level with the heart with the elbow extended and palm facing upward. Then, palpate the brachial artery to identify location and apply the cuff directly over the brachial artery. There is usually an arrow to indicate the centre of the cuff, which should be directly above the brachial artery. Wrap the fully deflated cuff snugly about 2.5 cm above the antecubital fossa and secure.
  • If using the leg: Position the leg so that it is at an equal level to the heart, then wrap the cuff around the thigh with the bottom of the cuff slightly above the knee. The popliteal artery will be used for BP measurement. This is easier if the patient is in a prone position. Note that the systolic pressure in the popliteal artery is usually 20-30 mmHg higher than that in the brachial artery.

Step 4

Palpate the artery to determine the systolic BP:

  • This ensures that the auscultatory gap does not interfere with accurate reading of the BP.
  • Inflate the BP cuff and note when the pulsation is no longer palpable.
  • Release the cuff and wait one to two minutes.

Step 5

Position the stethoscope over the brachial artery and use the bell side.

  • If a doppler is being used instead, apply the conducting gel to the site where the pulse distal to the BP cuff was palpated.

Step 6

Auscultate the BP:

  • Pump up to 30 mmHg above the palpated systolic BP.
  • Slowly release the pressure so that it falls by 2 to 3 mmHg per second.
  • Note the manometer reading at Korotkoff phases 1, 4 and 5.
  • Continue to listen for another 30 mmHg.
  • Deflate the cuff rapidly.

Step 7

If a repeat is necessary, wait two minutes before inflating the cuff again.

Step 8

If required for your assessment, repeat the procedure on the other arm or in a standing position for a postural BP.

Step 9

Remove the cuff.

Step 10

Advise the patient of the result.

Step 11

Clean and return the equipment.

Step 12

Document.

Blood Pressure Results and Documentation

BP is recorded as a fraction, with the top number representing the systole and the bottom number representing the diastole. If first and second diastolic are recorded, the first diastolic is written over the second, i.e. 120/90/80.

Documentation post the assessment is essential and should include the location the BP was taken and any factors that may have impacted the result. Furthermore, it is important that healthcare professionals note that drastic changes in BP can be a sign of clinical deterioration.

Common Blood Pressure Measurement Errors

  • Bladder cuff too narrow or wide
  • Limb being assessed is unsupported
  • Insufficient rest before the assessment
  • Repeating the assessment too quickly
  • Cuff not wrapped tightly and evenly
  • Deflating the cuff too quickly
  • Deflating the cuff too slowly
  • Failure to use the same site for consistency
  • Limb being assessed is measured while above their heart level.

References


Test Your Knowledge

Question 1 of 3

Swishing occurs in which phase of Korotkoff sounds?

Author

educator profile image
Ausmed View profile
Ausmed’s editorial team is committed to providing high-quality, well-researched and reputable education to our users, free of any commercial bias or conflict of interest. All education produced by Ausmed is developed in consultation with healthcare professionals and undergoes a rigorous review process to ensure the relevancy of all healthcare information and updates to changes in practice. If you have identified an issue with the education offered by Ausmed or wish to submit feedback to Ausmed's editorial team, please email ausmed@ausmed.com.au with your concerns.